
Alright my friends, the time has come to put your big girl/boy pants on and join me in finally getting those thousands of digital photos organized. Notice how I didn’t include this in the “Teeny Tidy Tips” section of my blog. Nope, this is a biggie and don’t I know it. I take a ton of photos and always have so I relate to those of you that feel completely overwhelmed by the vast amount of photos you wish were organized.
Do you attempt to snap a quick photo of your toddler as he cuddles the dog only to be greeted (quite rudely) by your phone saying “not enough available storage”? Do you stress about having to wade through hundreds of photos in order to select a few favorites from the year for your holiday cards? I am here to help you enjoy your photos instead of slightly despise them and their disorder. This will not be a quick fix and it will suck up big chunks of time over the next few weeks to complete this mission, but you will be so thrilled with the results when we are finished (and who knows, maybe you will even be inspired to print a few photos to display). Once you implement a system that works, you will know how to keep things in check going forward and you will never have to do a photo overhaul like this again.
Quick disclaimer- there are many different ways one could organize their photos. This is how I’ve done it for years and it works for me which is why I am sharing it here. You might find you prefer using Google Photos or some fancy system that involves tags or changing file names. Whatever works, go for it! Hopefully you will find something here that add to whatever system works best for you.
Step 1: CHOOSE YOUR BACK UP SYSTEM
I use two back up systems. I have an external hard drive that always stays plugged into my desktop computer and I also have everything automatically backing up to my cloud system, Backblaze (costs $55 a year if you buy two years at a time.) Why do I have two systems? I use the external hard drive because it is easy to navigate and I can access my photos quickly and simply. I use Backblaze (my cloud storage system) because my external hard drive is bound to break one day or could be stolen and knowing that all of my photos are out there, floating in the safely of the cloud (or wherever the hell they are) helps me sleep at night.
I own the WD 2TB Portable External Hard Drive (this is an affiliated link) which I like for its smaller size and its popularity. (Be aware that if you are a Mac user, you will need to reformat this which sounds complicated but it really isn’t. You can find the steps of how to do this in the 2nd review on Amazon.) If you have a lot of photos, I would suggest getting a hard drive with at least 1TB of space.
Okay, that very unsexy but super important step will feel great to be done with.

STEP 2: Gather ALL your photos in one spot
Next step is to gather all of your digital photos into one place, such as a desktop computer or laptop. If you have old laptops, phones or iPads with photos on them, you will need to transfer them to whatever master device you have chosen. If you have an external hard drive, connect it to your master device and dump all your photos there. You can just name a folder “Photos” or maybe “An Insane Amount of Photos That Seem to Accumulate on Their Own” or whatever seems fitting.
STEP 3: SEPARATE PHOTOS INTO YEARS
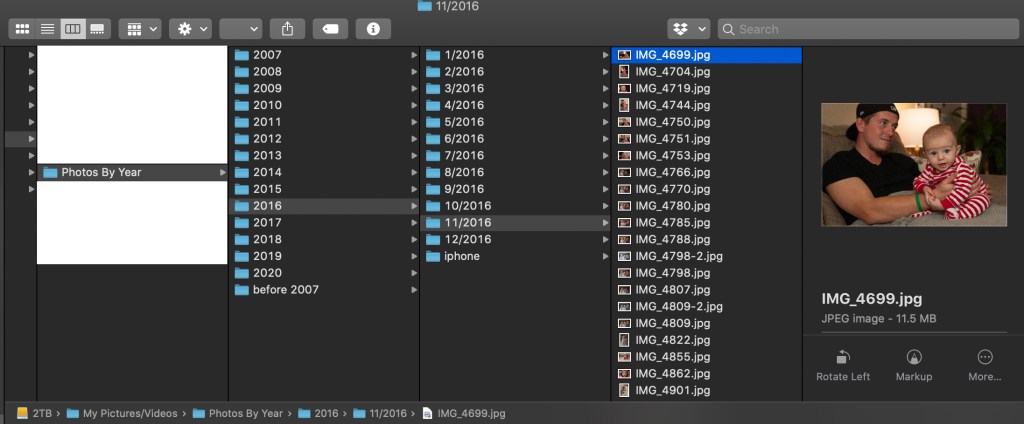
Here is a picture of my folders on my backup hard drive. Within my “Photos” folder, I made a folder for each year. Within each year, I made folders for each month and for my phone photos. The reason I did this is because I organize the photos I take with my SLR camera into months when I edit them and so it is just easier to back them up in the same manner. Also, I like to keep my “fancy camera photos” separate from my iPhone photos because it is easier for me to find what I am looking for that way. You might choose to only have folders for the years and no other subfolders. I honestly think that is a great and simple way to at least start off. I can browse through my photos pretty quickly to find what I am looking for when they are all in the same location but when they are put into many subfolders, it gets harder to sift through. Some people like to organize each year by events which you can totally do, but beware of this method slowing down your process.
Now that you have your designated folders, it is time to do the dirty work. This step takes a long time as you have to figure out when each photo was taken. Most of the time you will be able to find the date easily when clicking on the photo. If you know that date is wrong, just guess and move on before you drive yourself crazy.
STEP 4: TRIM THE EXCESS
Once you get to this point, you will feel pretty damn proud of yourself. You took photos from multiple sources and organized them into nice and tidy folders. Good work! You are almost there! Now if you are like me, those folders would be bursting at the seams if they weren’t digital. In order to enjoy your photo system and use it easily, it is important that you trim the excess and keep only your favorites. If you come across ten photos that are basically the same shot, pick your favorite and delete the rest. You truly don’t need ten photos of that soup you made, even if it was delicious. Then, when you desperately need that soup photo (okay maybe soup wasn’t the best example here) you won’t have thousands of photos getting in your way.
Aside from these soup photos, this step of deleting the excess can be really intense and you might need to take a week off before taking the plunge. I mean think about it, these photos represent a decade or more of your life during which a lot of happy and tragic events occurred. Most of the photos may be of smiling faces and beautiful places, but as you go through them you are bound to think of all the hard times that might not be obvious to someone else looking at the same photos. While writing this, I was looking through my own photos and got sucked into a photo time warp, an experience we all know too well. You open up a folder of photos and then all of the sudden, a half hour passes you by and you are deep in it. I found pictures from Christmas in 2015 at my in laws house and was immediately pulled back to that difficult time. We had just found out that my father in law had stage four cancer and we were all terrified of what the future would look like. Although these photos are hard to look through in some ways, it also means so much to me and my family that we have them to look back on. My daughter’s memories of her grandpa during those precious few years are fuzzy and showing her these photos will help her memories come into focus more clearly. This is why we want to keep our photos organized. These photos represent moments from our past and deserve to be taken care of.
STEP 5: CONNECT TO THE CLOUD
Like I said, I use Backblaze as a safeguard in case something were to happen to my external hard drive. Finding a cloud service to back up your backed up photos is essential. While I rarely even use Backblaze since my photos are easily accessible on my desktop, it feels wonderful to know that every photo is in safe keeping as soon as I upload it to my computer. I have Backblaze constantly working in the background, backing up my computer and external hard drive and I never have to lift a finger.
STEP 6: CREATE A BACK UP ROUTINE
Alright, now that everything is nice and organized, do your best to not fuck it up! Here is what I do: every week or so, I go through the photos on my phone and ruthlessly delete. After going through literally thousands of photos, it is pretty obvious to me which photos are worth keeping and which ones never deserved to be taken in the first place. Most of my food photos? Deleted. Screen shots? Deleted. Photos where eyes are shut or the focus isn’t perfect (what can I say, I’m a perfectionist)? Deleted. I even go through and edit my favorites right there in my Photos app because I’m a photo nerd. About every four months, I upload all my photos to their designated folder and delete them all from my phone. Ahhh, such a fresh and wonderful feeling! Never again will you see that infuriating message “not enough available storage”, reminding you that you are a lazy ass who never takes the time to dump your photos onto your computer. Nope, that old self is gone this new person is going to take a damn photo whenever she damn pleases, thank you very much!

Maybe I don’t delete each and every food pic after all. I had more than I’d like to admit to pick from to share here with you.
